
How to Build a Home Sprung Floor
In this article, I’m going to explain how to easily build a DIY sprung floor. This uses readily available products from Bunnings, as well as special foam pads which you can purchase from us. In addition, we have studio quality vinyl dance flooring that you can purchase to finish the floor.
The sprung floor is 4m long by 3.6m wide. It’s possible to make different lengths too, in increments of 0.8m. For example, 3.2m, 4.8m, 5.8m long, all by 3.6m wide.
The sprung floor will cost around $600 to build for a 4×3.6m space. The dance vinyl we sell is $750. Approximately $1350 all up for no more than a day’s work.
The end result will be as good as or better than many professional dance studio floors.
There are even higher performance options available, but they will cost a lot more and be much trickier to build. We suggest reserving these options for professional studios.
If you are a dance studio owner and you want to know more about this and our manufactured options – contact us!
Why do I need a Sprung Floor?
A sprung floor is sort of like the suspension system on a car. It absorbs impact and makes for a softer journey – a softer dance journey!
But more than that, it is critical for safety.
Dancing on hard concrete is extremely dangerous for the body and joints. This is particularly true if done long-term. Even more so, for younger dancers and their developing, growing joints. There is very real, potential permanent damages that dancers can develop from using the wrong floor.
Jumps, leaps and anything that requires a landing or impact on the floor, need to have that energy absorbed.
If you jump on concrete, when you land, you’ll feel that impact. It sends a sharp jolt up through the feet, into the shins, through the knees, hips, spine and right up into your neck and head. If you really focus on it, you can absolutely feel that shock wave going right through to your head.
Every part of the body’s core structure is put under additional stress and pressure from this impact.
A sprung floor reduces this impact.
When you land on a properly designed sprung floor, the impact you feel will be SUBSTANTIALLY less.
This in turn helps protect the joints and body from injuries.
Now, if you’re not doing any jumping or landing of any kind – it’s probably not too important for you! But it’s certainly not going to hurt.
If at home you’re focusing on stretching, floorwork and basic movement exercises, you can probably get away without it. But if you’re doing a lot more than that, particularly if you’re spending a lot of time practicing, we would do recommend you get Sprung!
What is a Sprung Floor Made of?
There are many different sprung floor designs out there. But in essenece, they all consist of the same thing:
- Firm, top layer/surface
- Flexible underside which compresses to absorb impact
The top layer can be made from many different materials. It can be plywood, chipboard, plastic or really just about anything that is strong enough to be a ‘floor’.
Now that doesn’t mean that they are all identical in performance or quality.
The underside can also be made from many things. In general though, it’s a type of spongy or spring foam, or a special timber construction called a basket weave.
What’s the best?
For the top layer, we suggest plywood as the optimum surface. The flexibility is just right. It has a medium-density and a level of softness that makes it ideal for impact absorption. We can get very technical here. I won’t. Just know that we feel it is the ideal, optimal, best of the best option for a sprung floor.
The second option would be a particle board or chipboard structure. In Australia, we are generally talking Yellow Tongue Structa Floor.
These are the two most common top layers used in Australia.
If we were to give you a rating on performance ability, it would go like this:
- Concrete Floor – 1/5
- Vinyl directly on Concrete – 2/5 (based on our 5mm thick vinyl – tap is still a 1/5)
- Yellow Tongue StrucaFlor – 4/5
- Plywood – 5/5
So why would you choose YellowTongue over plywood?
Two things – it’s easy and it’s cheap. It’s about half the price of ply.
For a professional dance studio, we will ALWAYS recommend plywood. But anything is better than nothing. So we are happy to work with Yellow Tongue options if plywood is out of the budget.
DIY Home Sprung Floor
In most cases, we are going to suggest using Yellow Tongue for a DIY home studio. We have a super easy design that is cost-effective, performs, and is quick to build with minimal skills.
These benefits usually mean the difference between actually GETTING a sprung floor and not. So it takes you from a 1 or 2 out of 5 and brings you right up to a 4/5 in terms of safety and performance. That’s enough for me!
Please note, this design won’t really work for a large, professional dance studio. We have our own product for that. Chat to us to learn more if you wish to build a bigger, professional setup.
How to Build Your Home Sprung Dance Floor
OK, enough background. Let’s get into the details.
Tools
- Drill or impact driver with a Phillips head driver bit
- Handsaw, circular saw or dropsaw (not much cutting needed)
Materials
- 5 Sheets of STRUCTAflor 19 x 3600 x 800mm from Bunnings ($40.50 each)
- 15.2m of 40x12mm Pine from Bunnings ($8.40/m) – There’s a lot of flexibility with this one. It can also be done from cheaper 12mm plywood and ripped on a table saw about 40-50mm wide. If you know what you’re doing, feel free to substitute other options. The critical thing is that it’s 12mm thick. This is a must!!
- Approx 60 x 8g 28mm Chipboard Screws from Bunnings (2 packs, $3.60 each pack of 38)
- 234 Inspire Sprung Floor Foam Pads – ($1 each) – These are specialised closed cell EPDM foam pads with high strength 3M double-sided adhesive. We have optimised the exact density, dimensions and specifications for our sprung floors. They are made exactly to our specs and are particularly difficult to find off the shelf! We’ve tried for about 2 years, eventually gave up and started having our own custom manufactured for us.
- 8m Dance Floor Vinyl ($750) – (we can quote a custom length if you require a different floor length)
Instructions
Lay out your sheets of chipboard ideally up on a table. You’ll find it better working standing up!
Your foam pads come with a white covering on one side. This is the adhesive film protector. Peel this off to reveal the adhesive. It’s just like a sticker.
Install the foam pads on the underside of your chipboard in a grid formation. The spacing of the grid should be 250x250mm.
You can measure this up with a tape measure, or if you have some large section of cardboard, consider making a template to speed things up.
The outer edges of the floor should NOT have any foam pads.
The finished result pattern will look like this:

You’ll notice a few things in the above picture. Firstly, you’ll see at the section where the plywood tongue and groove joins, there are twice as many foam pads. This is REALLY important. Without this extra foam here, you’ll feel the join. It will feel softer and feel like it’s bending when you stand on it. So just do it this way!
Secondly, don’t put any foam pads around the outside. So you’ll just start putting the pads on 250mm in from the outer edge. This is the yellow border section. This yellow border will be your 12mm perimeter battens (the 12mm thick and 40mm wide pine).
Once all your foam pads are stuck in place, it’s time to start laying out your floor.
Just in case there is moisture in your floor or dampness from the concrete, we recommend you put down a layer of builder’s plastic underneath. This just protects the floor from any moisture and mould. It’s not vital, but an optional extra. Particularly if there’s any chance of moisture in the flooring.
Flip your boards around so the foam pads are on the bottom. Join them all together so the tongue and grooves all connect.
Next, take your 12mm thick pine perimeter battens and place them around the outside, underneath the chipboard. Start with the first length and drill it into place with the chipboard screws.

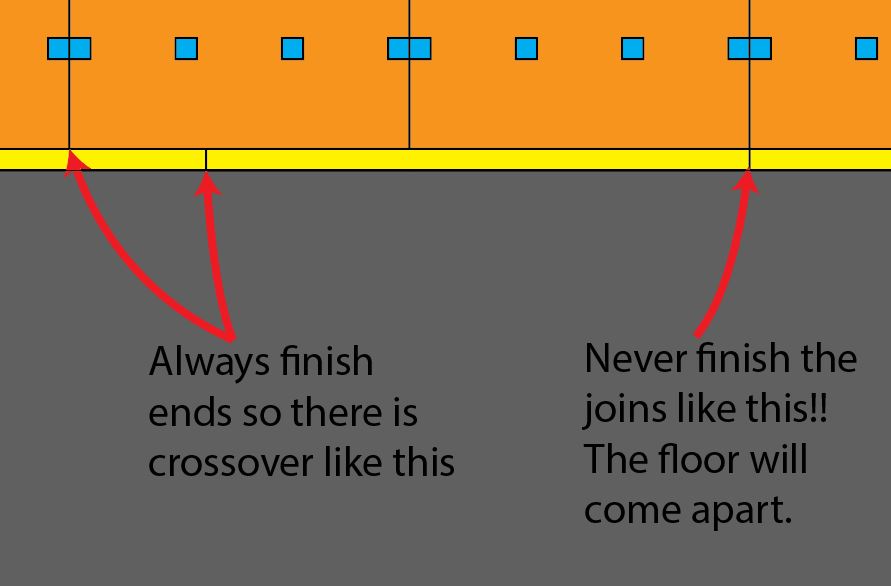
There are two jobs for these sections. The first is to make the edges of the dance floor firm. If it just had foam to the end, it would feel soft and move a lot. These are always needed to create a strong edge. The second is to connect the sheets of chipboard together so they don’t pull apart in use. To make this work, you need to ensure the battens never end on a join of the chipboard. If they do, just cut it shorter so there is overlap. Use a minimum of 2 screws on either side to lock the chipboard panels into place so they can’t pull out of the tongue. Use approximately a 250mm spacing for the screws.
That’s pretty much it! The sprung floor is done. It’s really not that hard to do.
Installing the Vinyl
This is the easy bit!
The vinyl is 1.8m wide. Stacked side by side, this takes you to 3.6m wide (the length of our chipboard panels – this is intentionally designed for this reason).
We can pre-cut these to 4m lengths for you. Or 4.8m, or 3.2m. Whichever you are going with. Just chat to use beforehand so we know what you’re doing.
Roll the vinyl out like shown below. You can tape it down with double sided tape or duct tap around the outside and on the joins, to hold it all in place.
We also sell special vinyl double sided tape for $30/roll (30m roll).
You can refer to this video for a little extra information on installing vinyl. This is for a large dance studio space, so a lot of these sections don’t apply, but the main process using the double sided tape is still the same.

Can I use Pool Noodles?
Now, you may find a few videos out there on doing this with pool noodles.
Can you do it?
Short answer, yes. But it’s a massive pain and has its drawbacks:
- Pool noodles are actually quite fiddly to cut up consistently without the right tools. They cut easily, but getting them to the same thickness requires the right tooling to make that process easier. I’ve tried with a dropsaw and they just go all over the place! It’s a mess and will take a few hours!
- You need to glue them on. And that’s not fun. There’s a lot of glue to do and you need to wait for it to dry. It’s just messy and awkward. Yes, it works, but trust me it’s so much nicer to just stick on foam pads with an adhesive (I’ve done it all).
- Pool noodles will be higher. It’s generally recommended to go with 50mm thick pads. This makes your floor 70mm high. That’s a big step up. It makes your floor bulky and big. It also means you’ll now need much thicker perimeter battens which will cost a lot more, taking away from the savings you made from buying $50 of pool noodles.
- Performance isn’t as good. Pool noodles absorb the impact, but they don’t have the same spring back that our foam pads have. So in practice, they’ll have a tendency to suck the energy out from your dancing. They’ll be safe, but they just take that little bit of extra spring out of the floor.
So in summary, pool noodles won’t save you much, take a lot longer to do, and the end result isn’t quite as good (though arguably this here is a subtle amount).
Conclusion
That’s it! Super easy and super safe. We’ve selected and designed all the parts to really minimise the effort and skills required to DIY this flooring.
If you’d like to purchase any of the listed components from us, please send us a message on Facebook first. That way we can ensure to get all the details right for you.
Any questions with the instructions above, again, please let us know. Always more than happy to help with suggestions to suit your needs and requirements for your space.
Take care and happy, safe dancing!
Matt